
Hotshot Hike Training
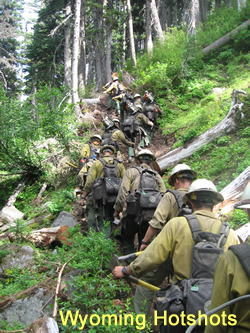 As a firefighter on a hotshot crew, you're a professional hiker. You will scale mountains, slosh through streams, cross boulder fields, and trudge and march through some of the most miserable terrain America offers. This is what makes the job fun.
After hiking for an hour or two, you'll then be expected to cut fireline. Then, when you're thoroughly exhausted, you will hike home.
Bottom-line: If you can't hike with the crew, you don't deserve to be on the crew. Hiking with a pack over broken terrain isn't something that you can just get off the couch in May and start doing well. You must train for it.
Furthermore, "The Pack Test" doesn't come close to simulating the training hikes that you'll do on a hotshot crew. Just because you walk across flat ground for 45 minutes with a 45lb pack, don't think you're ready for the rigors of the fire season.
To help you get ready for the season, we've put together a training plan that's designed to compliment your running workouts. Stick with this plan and you'll show up at your duty station ready for the season.
All hikes will classified into three levels:
Level 1: Line Gear Only = ~25lb pack weight. (L1)
Level 2: Chainsaw + Line Gear = ~45lb pack weight. (L2)
Level 3: Piss Pump + Line Gear = ~60lb pack weight. (L3)
You can vary the length and time of your hikes, but shoot for at least 45 minutes, minimum. Most hotshot training hikes last between 45 minutes and 1.5 hours, so be prepared.
Things to remember:
- Wear your fireboots while you're training. You don't want to surprise your legs with five pounds of boots on the first hike of the season. Plus, it's good for the boots to be periodically worn throughout the off-season.
- Get a good pack to train with. Or a weight vest.
- Warm-up and stretch before you throw your pack on your shoulders. Anything from jumping jacks to a brisk walk for 5-10 minutes will help get your blood moving.
Gear you need:
- Good boots. We've put together some solid info about why a good pair of boots are crucial. Plus, we interviewed White's Boots PR guy to get the scoop on why their boots are the gold standard in the wildland fire community.
- Good socks. Just as important as a boot pair of boots is what you use as a buffer between your feet and the boots rough leather. We recommend wearing two socks at the same time: a thin liner and then a thick, heavy sock over it. Trust us. Your feet will appreciate it.
- A good pack.
- A hydration bladder. Fumbling with the lid of a nalgene bottle while trekking is problem of the 90s. Camelback fixed that, and made drinking and walking a painless activity. Invest in one. Almost all packs nowadays come with stash spots for water reservoirs.
- Goldbond or BodyGlide. Avoid using these products at your own peril. But don't tell us we didn't warn you.
| Monday | Tuesday | Wednesay | Thursday | Friday | Saturday | Sunday | |
| Week 1 | 2mi | Rest | 2mi | Hike (L1) | 2mi | Rest | Rest |
| Week 2 | 2mi | Hike (L1) | 3mi | Rest | 2mi | Rest | Rest |
| Week 3 | 2mi | Hike (L1) | 3mi | Hike (L1) | 3mi | Long Hike (L1)4mi | Rest |
| Week 4 | 3mi | Hike (L1) | 2mi | Hike (L2) | 3mi | Rest | Rest |
| Week 5 | 4mi | Hike (L1) | 3mi | Hike (L2) | 3mi | Long Hike (L1)5mi | Rest |
| Week 6 | 4mi | Hike (L1) | Intervals | Hike (L2) | Rest | Long Slow Distance | Rest |
| Week 7 | 4mi | Hike (L2) | 4mi | Hike (L2) | Intervals | Long Hike (L1)5mi | Rest |
| Week 8 | 3mi | Hike (L1) | Hill Workout | Hike (L3) | Rest | Long Slow Distance | Rest |
Check out these great training products from Amazon.com:
| Monday | Tuesday | Wednesday | Thursday | Friday | Saturday | Sunday | |
| Week 9 | 2mi | Hike(L2) | 5mi | Hike(L2) | 3mi | All-Day Hike | Rest |
| Week 10 | Hill Workout | Hike(L2) | 3mi | Hike(L2) | 4 | Long Slow Distance | Rest |
| Week 11 | 4< | Hike(L2) | Intervals | Hike(L2) | 4 | All-Day Hike | Rest |
| Week 12 | Intervals | Hike(L3) | 5 | Hike(L1) | 4 | Long Slow Distance | Rest |
| Week 13 | Hill Workout | Hike(L2) | 4 | Hike (L3) | Rest | 2mi / FAST! | Rest |
| Week 14 | 5 | Hike(L2) | 4 | Hike (L2) | 4 | Long Slow Distance | Rest |
| Week 15 | 4< | Hike(L3) | Intervals | Hike(L2) | 5 | All-Day Hike | Rest |
| Week 16 | Hill Workout | Hike(L2) | 5 | Hike(L1) | 2mi/FAST! | Long Slow Distance | Rest |
Training Exercises:
It's a good idea to diversify your workouts as much as possible - shocking the system with new exercises prevents plateaus and burn-out. Below are some suggestions for mixing up your hiking routine.
* For all the following exercises, begin with 45 minute sessions, then build up in 5 minute increments.
Rake Hike
Requirements: A rake and a pack. This training exercise not only simulates cutting fireline, but it will also earn you some karma points with your fellow hikers. Starting at the bottom of your usual training hill, get moving and start sweeping the trail with your rake. Aim for one lick every other step. Great for getting your lower back used to being hunched over, and for keeping your favorite hike free of pine needles, leaves and branches. Be prepared for awkward stares.
Tire Training
Requirements: A tire & a rope. (Though carabiners and a rock climbing harness make this a lot more comfortable...)
Mountaineers have used this technique for years to prepare for high-altitude summits. It's a great low-cost way to simulate that feeling of the dreaded 500 pound leg, where every step is a battle. Start off on flat-ground then slowly progress to more moderate inclines. Start off in a field, on a dirt road, an abandoned lot, a parking lot, or on the beach. Whatever you do, avoid trails- tires can shred them up and create irreperable damage. If you can't find a place to drag a tire, try the exercise below.
Sled Training
Requirements: Cheap Plastic Sled and a rope.
This is great if fire season is fast approaching, and you need to get some hiking in but there's snow on the ground. Put on your boots, fill up the sled with kids, dumbbells, snow, whatever - and start humping around. It's effective because it shifts the weight from being vertically centered over your shoulders and core to being pulled perpendicular to your core. Shifting the vector's angle (remember 10th grade physics?) engages different muscles. It seems silly, but try pulling a sled for 30-45 minutes. Then watch Balto.
Concrete Mountain Climbs
Requirements: A pack and a multi-story staircase.
For flatland city dwellers, it's often times tough to find a good training hill. So make the best of your situation and go find a multi-story parking garage with a stairwell. Apartment complexes work too. Put on your pack and start hoofing it. Take it easy going down. For an added burn, throw in some lunges on the landings, take steps two at a time, or do a set of ten calf-raises every time you get to the top.
On-Your-Own!
Requirements: A pack and a hill.
Hotshots hate to think about this, but there might come a time when everything gets FUBAR'ed, and it's a footrace to the top of hill - winner takes all. That nightmare scenario will inevitably come when you're exhausted and running on empty. But it's the physical conditioning that you do in the off-season that just might get you to the top of the hill with little more than ember wash down your yellow. Do this exercise on your usual training hill. Summit the hill once at a normal pace, then hike all the way down to the 1/4 mark (i.e 75% of the way down). Might be helpful to flag off 1/4, 1/2 and 3/4 marks on the hike, or just use visual clues. Once you hit the 1/4 mark, quickly turn and begin hiking back up with no rest. Once you're halfway up the hill, bump up the speed to a fast walk. Once you hit the 3/4 mark - ditch your pack and start running. Finish as strong as you can. Your lungs will be burning and your legs too. As you catch your breath, think about how slow you were moving at the end. Then vow to train harder.